Quilting Supplies at Craftsy.com
12-03-2018

I wanna be where the Quilts are…

Mermaid Quilts

I want to be where the Quilts are…

Related image

Well that’s not quite how the line goes… but we all know that is definitely what she was thinking:)

I have a couple of mermaid finishes for you guys today!

Mermaid Quilts!!!

I so enjoyed making this set of twin mermaid quilts…. well they are not exactly twins, but close.

They are for two sisters that I love dearly and have yet to make them a quilt.

Their names are Zoe and Khloe and they also go by the “Think So Twins”…check out their you tube channel!

One reason I picked this fabric for these little girls is that they are African American and I wanted them to see a beautiful mermaid that looks just like them.

I absolutely loved this fabric line…. The castle blueprints!!!

Mermaids, Unicorns, Norwals, Castles…. the cutest!

This fabric line in Magic by Sarah Jane for Michael Miller Fabrics.

I uses one layer cake to make both of these quilts. I just divided the pinks and blues and addes some of my own for borders.

My piecing was simple because I really wanted the fabrics to show.

I just loved the sayings tossed in there.

So grab those Layer Cakes and just start cutting them up!

You might just make something extra special:

Quilt on my friends!

Online Quilting Class

You can find and follow TheSassyQuilter  on Facebook, Pinterest, Bloglovin’, Instagram, Twitter or by email(form on right sidebar)!

Keep it Sassy♥


Share Button
11-23-2018

Layer Cake Pop- Layer Cake Quilts

Layer Cake Quilt Pattern

This beautiful quilt has finally been quilted!

This was a wonderful layer cake quilt pattern from Fat Quarter Shop that I did way back(omg it was Jan 2017) using their famous series they do called Short Cut Quilts...

And guess what?

It only takes a half a layer cake and a jelly roll for the background…

and it is a FREE PATTERN!

Boom! So easy.


I used a layer cake from Cotton and Steel, Mesa by Alexia Abegg, to make this quilt.

The cream fabric was a nice match up.

I just love how this quilt turned out. The fabrics really pop!

I quilted it using a loop de loop pattern around all the center squares. I think this also helped the fabrics take center stage.

Here is the Fat Quarter Shop’s Short Cut Quilt video you need to make this quilt:

Be sure to watch and give them a like on YouTube.

Here is a link to my previous post…HERE.

I seriously hope you guys give this quilt a try and add it to your list of layer cake quilts!

Happy Quilting Sassites:)

Online Quilting Class

You can find and follow TheSassyQuilter  on Facebook, Pinterest, Bloglovin’, Instagram, Twitter or by email(form on right sidebar)!

Keep it Sassy♥


Share Button
11-10-2018

Layer Cake Quilts- Origami Squares

I have a fabulous finish for you guys today!

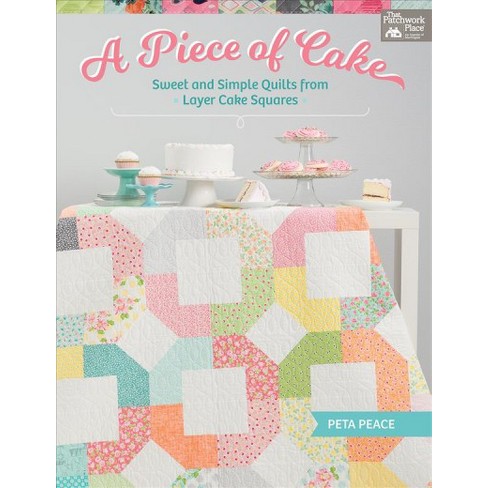
This quilt is from a book dedicated to all things layer cake!

Image result for peta peace layer cake

A Piece of Cake

Sweet and Simple Quilts from Layer Cake Squares

by Peta Peace

We all know we have at least 10 layer cakes piled up waiting for some inspiration….

pattern: “Origami Squares”

I just loved this pattern because it only required one layer cake.

Now… I made this layer cake myself because I wanted these specific colors.

I’m dying to try it again!


I used an all over stipple pattern for quilting and a zig zag stitch to finish off my binding.

And it wouldn’t be finished unless it has a label!

So I added my pre-made labels from ikaprint.com. Love these!

So if you have some layer cakes you wanna dive into… check out this book:

A Piece of Cake

Sweet and Simple Quilts from Layer Cake Squares

by Peta Peace

Leave a comment telling me how many layer cakes you have stored up in your sewing room:)

(I have 20 something! Yikes)


Keep it Sassy♥

You can find and follow TheSassyQuilter  on Facebook, Pinterest, Bloglovin’, Instagram, Twitter or by email updates(form on right sidebar)!

Share Button
02-09-2017

Baby Whale Quilts! 


Baby whales and cutie pies!

Gotta love ’em…. so adorable.

This is my recent finish on a baby quilt for my soon to be nephew, Oliver. This quilt was super easy to make and I just loved the color scheme. My youngest niece is loving it too….. I’m not sure she is ready to share this chair….even though she has her own quilt.

I just went through my stash and picked out an assortment of navy and gray fabrics.

Cut 36 squares 6.5″ x 6.5″ and sew them together, 6 across and 6 down.

Finishes 36.5″ x 36.5″… perfect crib size.

The appliques were super easy! I used some Steam a Seam 2 and ironed it to my whale fabric. Printed off some whale shapes from online and shrunk it down to the size I wanted.  I traced it onto the fabric and cut it out. Then peel off the back and ironed it on.

I chose a simple topstitch to secure these whales. Not easy hitting all the curves, but just go slow and one stitch at a time in the tight spots. It also helped to only do 4…. not all over the place, and I like how it looks better too! Don’t want to overdo the whales.

Here is another whale project I did recently…


Whales on the brain, lol.

This one is for my local guild. We have an exhibit at the Mid-Atlantic Quilt Show at the end of this month. It is titled, Ombre… Your Way!

I made my own pattern for this one too… but, I spray basted the whale to hold it in place and then stitched it down. I used a zig zag stitch for this one and did a little more quilting.

The hexagons were also spray basted on and then top stitched.

Simple, but cute!

Craftsy

Keep it Sassy

You can find and follow TheSassyQuilter  on Facebook, Pinterest, Bloglovin’, Instagram, Twitter or by email updates(form on right sidebar)!

Share Button
08-04-2014

Fat Quarter Style Book Tour and a Giveaway!

Fat Quarter Style Book Tour

Welcome to my stop on the Fat Quarter Style Book Tour!

Fat Quarter Style is the latest book by Fat Quarter Shop’s pattern company, It’s Sew Emma. Fat Quarter Style has 12 fat quarter quilts with 4 size options each….love that! I also really liked that it includes both traditional and modern pattern styles.  All super cute! For the book tour each blogger was assigned one of the quilts and we are featuring a block from that quilt. Mine was the pattern, Mosaic, and let me tell you this block was so quick and easy I just decided to go ahead whip up the crib size quilt!

Mosaic

Mosaic Quilt

This pattern only required 9 fat quarters and I paired them with a light grey solid(Kona Silver). It was fun to just pull these fat quarters from my stash! I most often using a collection of some sort.

Mosaic Quilt

I quilted it using an Aurifil, 50 wt. cotton in a light grey(#2600).  I decided to free motion quilting a meander or stipple within the blocks….

Mosaic FMQ

and a loop-de-loop design in the sashing and borders.

Quilt Labels

For my binding I pieced together the leftovers and used THIS machine binding tutorial. I finished it off with one of my custom made labels which you can have made HERE, super affordable and cute!

I’ve got my eye on a few others in here and can’t wait to get started. Maybe I can use up some of this stash that keeps eyeballing me!

Purchase your copy of Fat Quarter Style HERE

Fat Quarter Style Book

Fat Quarter Shop has given me a copy of Fat Quarter Style to give away to one of my readers, yay!

To enter:

Just leave a comment on this post!

For a few bonus entries…..leave a comment telling me how you Follow Fat Quarter Shop and how you Follow The Sassy Quilter!

You can Follow the Fat Quarter Shop on Facebook, Pinterest, Instagram, Blog-The Jolly Jabber, Twitter, or subscribe to their You Tube Channel.

You can find and follow TheSassyQuilter  on Facebook, Pinterest, Bloglovin’, Instagram, Twitter or by email updates(form on right sidebar)!


Each stop on the tour will be giving away a copy of Fat Quarter Style, so be sure and check out all the other stops on the tour for lots of chances to win !

Fat Quarter Style Book Tour

#1  August 4th : Paula of The Sassy Quilter
#2  August 6th : Kelly of My Quilt Infatuation
#3  August 8th : Karin of Leigh Laurel Studios
#4  August 11th : Caroline of Sew Can She
#5  August 13th : Jana of Jana Machado
#6  August 15th : Amy of Stitchery Dickory Dock
#7  August 18th : Lee of Freshly Pieced
#8  August 20th : Holly of Bijou Lovely
#9  August 22nd : Ashley of Film in The Fridge
#10  August 25th : Erin of Why Not Sew?
#11  August 27th Kristyne of Pretty By Hand
#12  August 29th : Amy of Diary of A Quilter

Purchase your copy of Fat Quarter Style HERE

**edit- giveaway ends Aug.11th at midnight/EST, winner announced Aug.12th**

Keep it Sassy


Share Button
06-25-2014

Crackerjack Quilt and Giveaway!

Crackerjack_Quilt

Crackerjack

Pattern by Swirly Girls Design

This Crackerjack quilt was such a fun and quick quilt to make! It is one of the Swirly Girls Design-Dashing Bobbin Series patterns.

These are made to be quick piece patterns and they don’t break the bank! Best part…..it only takes 10 Fat Quarters and some background fabric….love that.

crackerjack_quilt3

crackerjack_quilt1

I am so in love with this black pin dot I used for the background! I could use an entire bolt of this…..the only place I could find it was at a big box store**gasp**, so I am not sure what the name of it was.

The blocks are made from Daydream in Jewel by Swirly Girls Design for Michael Miller Fabrics.

crackerjack_quilt4

I quilted this in an all over meander or stipple design using a 50wt. Aurifil 100%cotton in white. This actually blended a little too well! I could barely see where I had quilted ….BONUS>>> you can’t see if I made any mistakes, Lol:)

Here is the back…

crackerjack_quiltback

I decided to use a different color within the blocks. I went with a teal 50wt. Aurifil 100% cotton. I thought the white was just too stark inside the block.

crackerjack_quiltback2

You can see the teal did not have too much contrast on the back so I was happy with it. It can get tricky finding threads that blend on both sides. I’m just now noticing the random thread on the loose…we all have those:)

Wondered how it would look if I did the whole quilt in this color???

crackerjack_quilt_label

I used my handy personal quilt labels that you can have made HERE. These are awesome and cheap!

Don’t ask me why I decided to use the teal thread on the binding, you always want to draw attention to your binding……right! Not.

I used THIS machine binding tutorial.

crackerjack_quilt5


*********************

Because you guys are so awesome….I have an awesome GIVEAWAY for you today!

Fort Worth Fabric Studio    

Fort Worth Fabric Studio has created a lovely bundle for this quilt…

and Swirly Girls Design is throwing in a FREE pattern!

Crackerjack_bundle

You can purchase this bundle HERE if you just can’t wait!

You can also get the pattern HERE over at FWFS.

If you buy this pattern now and win the giveaway, I can swap out a different one!

To enter the GIVEAWAY:

Leave a comment below telling me how you follow The Sassy Quilter, so that’s up to six chances! Do as many or as few as you like.

(giveaway open thru July 2nd and open internationally)

Thanks you guys for all your support and good luck!


Keep it Sassy

You can find and follow TheSassyQuilter  on Facebook, Pinterest, Bloglovin’, Instagram, Twitter or by email updates(form on right sidebar)!

Share Button
06-16-2014

My Favorite Quilt- Double Wedding Ring!

Double Wedding Ring Quilt

What is my favorite quilt????

Double Wedding Ring

I decided to go back into my quilt vault for this one and it is one of my favorites for so many reasons!

First and foremost it was my grandmothers favorite quilt to make; her signature quilt! She was the original “Sassy”… because that was her nickname. She taught me everything I know and this was like the second or third quilt I made, ever! She assured me it was easy and wouldn’t be too hard…..by the time I was done I swore off curved piecing forever. I no longer hold anything against curves, but haven’t forgotten, as a beginner, how crazy I thought she was telling me I could make this quilt! Guess what??? I did and I learned a lot! Each piece was drawn with a template and cut out with scissors and then it was hand quilted and hand bound. It is by no means perfect and I can definitely see how my style has changed since, but it is my favorite and I am so glad I got to make this quilt with my Sassy grandma before she left us.

IMG_1571

When did I make it? What pattern? What fabrics?

8 years ago from a pattern from Lap Quilting by Georgia Bonesteel, a quilting book that was my grandmothers. I still have that book. I used fabrics from my grandmothers stash and yes….a big box store…gasp!

Have I shown this quilt anywhere or entered it in contests?

No.

What memories or people does this quilt remind me of?

Sassy! of course. I remember sitting at her coffee table using her old Kenmore sewing machine while she sat in her recliner hand quilting her latest quilt.  She would readily help me work out my sewing machine disasters and assure me that a little pucker here and there were fine and to just keep going!

wedding_ring_backing

What do I like best about the quilt?

Hmmm, I would say the memories and that it actually looks like rings and it pretty flat! I was severely doubtful along the way:)

How did I grow as a quilter while making it?

Oh, I learned soooo much about accuracy and how important the cutting process is, curved piecing, improved my hand quilting skills, scalloped binding and how NOT to finish binding by hand! Those whip stitches look crazy on the back, lol! I did a reverse whip stitch and basically showed all the thread instead of hiding it. Good thing the thread color matches!

wedding_ring_binding

If I could make this quilt again, what would I do differently?

I love every crazy stitch on this quilt! But, I would like to make another in a completely different style. Unlike my grandmother…I don’t think it will be my signature quilt, but I do think it has a lot of wow factor and is totally worth the trouble.

Where is the quilt now?

It is actually the only quilt I have made myself that I actually use! It is in my living room as a throw for the couch.

IMG_1569

So…..

Don’t be afraid to be Sassy and try a quilt you think is out of your skill set! You might just learn all kinds of things and make a memory that lasts forever. Maybe even a Double Wedding Ring Quilt!

This post is being shared as a part of My Favorite Quilt @ SewMamaSew. Check out the link and see everyone’s favorite quilt or share your own!

Don’t forget a few other fun things that are going on:

Fat Quarter Shop Anniversary Sale!

fat_quarter_shop_sale

20% off purchase coupon code @ Gotcha Covered Quilting: SASSY

Gotcha Covered Quilting

My Sewing Machine Mat Tutorial and GIVEAWAY!!!

Sewing Machine Mat Tutorial

Keep it Sassy

You can find and follow TheSassyQuilter  on Facebook, Pinterest, Bloglovin’, Instagram, Twitter or by email updates(form on right sidebar)!


Share Button
05-29-2014

Sunnyside Triangle Quilt Finish!

TriangleButton800

sunnyside_triangle_quilt

Sunnyside Triangle Quilt by The Sassy Quilter, measures 50 x 64.

Were you wondering why you never got to see my finished triangles from the Triangle Quilt Along???

Well, it got a little crazy sorting through all the final entries that I got a little behind! I also got a new camera and am trying to figure out how to get decent pics….so easy on my trusty iphone.

sunnyside_triangle_quilt4

This quilt finishes at 50″ x 64″. I just loved working with these fun prints in Sunnyside by Kate Spain for Moda. I used a layer cake to cut mine and then added some solids to fill in the gaps.

sunnyside_triangle_quilt2

I quilted along each side of the diagonal seams in a 50wt, 100% cotton Aurifil thread. The color is a light gray that blended perfectly with all these different colors.

sunnyside_triangle_quilt1

For the backing I used a print from the same line.

sunnyside_triangle_quilt3

The back….

sunnyside_triangle_quiltbinding1

I used a Zig Zag stitch for my machine binding technique just to spice things up a bit! I think it is fitting for the triangles.

Actually, the stitch I used is a little more than just a zig zag, this is called an Elastic Stitch on your machine. It takes three stitches in each direction….a little prettier I think.

Keep the seam line in the center of the stitch and you are bound to catch your binding edge on the back of your quilt! This method can be a little more forgiving if you have a hard time keeping it in the ditch.

sunnyside_triangle_quiltbinding2

Here is the backside of the binding.

These labels are by ikaprint and can be designed in a ton of different styles! They really make it simple to get my quilts labeled, especially since I tend to forget that step…..I know, bad quilter!

These adorable labels can be purchased from ikaprint HERE!

ikaprint let me create my own online store with them so the labels are at a discounted price, yay! So click on the link above and have a look around.

sunnyside_triangle_quilt5

Last Chance Link Up!

Now! Who out there missed the date to finish up there Triangle Quilt???

Well, just for fun…

I will be posting a Last Chance Link Up on June 1st and I am going to give you until August 1st to link up your finished quilt for a secret prize…..ooooh, the mystery:)

So keep at it guys and gals! It is not too late to be inspired and get those Triangle Masterpieces finished up! You can do it!

TriangleButton800

Keep it Sassy

You can find and follow TheSassyQuilter  on Facebook, Pinterest, Bloglovin’, Instagram, Twitter or by email updates(form on right sidebar)!

Share Button
04-29-2014

Scrumptious Charm Quilt Finish!

Scrumptious Charm Quilt

Scrumptious Charm Quilt

Finished up my Scrumptious Charm Quilt this weekend! (I know…my names for quilts are lame!) This quilt used a Scrumptious by Bonnie and Camille charm pack and a white Kona snow charm pack. I added some yardage for borders and that’s it! I wanted a really simple quilt that was easy to put together AND actually let me use up some of this fabric that is in my sewing room just staring at me:) This is a great quilt for a beginner. I will share some more details on this pattern soon. I know for beginners the specifics for those borders, backing and binding really help.

scrumptious_ quilt

I totally got busted taking pics on my neighbors fence!!! Which is electric…yikes, only one buzz so that was a success(take note of the white rope). I gave her a quilted table topper as a peace offering so she is not pressing charges, ha ha! She was really just worried I would get electrocuted. If you grew up in the country you have most likely touched one of these bad boys…you won’t forget it, but not so bad. Does this make me seem crazy???

Scrumptious Quilt

For the quilting I used Aurifil 100% cotton, 50wt. in white. I started by quilting the center panel with some basic straight lines and then moved to the 2nd border and quilted more straight lines. I wanted to break up the lines so I did a simple loop de loop in the inner border. This wasn’t too bad because you have a defined space. You are doing just a simple row of loops. Now what for the outer border????

Scrumptious Quilt

The outer border was pretty wide, about 5″. I was feeling pretty brave after the inner border….okay, let’s do a feather! I had been practicing those a while back and was improving. I marked a blue chalk line along the center of the border to help( you can still see some of those)…..so where are those feathers??? Well, let’s just say it was like starting all over! It has been many months since my previous adventures and a lesson was learned. Use it or lose it!  I opted for lots more loop de loops. They came out okay, but I definitely got a little lost sometimes.

Now, I am just analyzing this to explain my process, but in reality I think it is just fine and when washed up will be perfect:)

Scrumptious Quilt Binding

I used a machine binding technique to finish my quilt. You can find the tutorial HERE. In my tutorial I tell you to stitch in the ditch along the binding, but as of late I really am liking to stitch just on top of the binding for a top-stitched look. It also makes it less noticeable if you veer off a bit.

Scrumptious Quilt Binding

Here is the back…..P.S. don’t you love the Scrumptious paisley backing! I really loved working with this line of fabric.

Scrumptious Quilt Binding

side note….Isn’t it funny how the white thread looks teal on the binding?

scrumptious_quilt1

The winner of last weeks Cotton Bliss Giveaway is….

Janie!

Congratulations and enjoy your 10 FQ’s of Mirabelle from Cotton Bliss.

Keep it Sassy

You can find and follow TheSassyQuilter  on Facebook, Pinterest, Bloglovin’, Instagram, Twitter or by email updates(form on right sidebar)!

Share Button
04-20-2014

Flower Power Quilt an Oblongagonalong Finish!

flowerpower1

So excited to have finished up my Flower Power quilt!

This one was part of a quilt along over at Sew Fresh Quilts, called the Oblongagonalong. This unique take on a hexagon…a slightly different shape created by accident was fun to play with! It is made with all Y-seams so that was the challenging part…but, I finally got those down pat I think:) Lorna@SewFreshQuilts did a great tutorial for learning how to do those tricky seams HERE.

flowerpower3

It finishes at 35″ x 44″ and was made using fabrics from the Cuzco line by Kate Spain for Moda. I added a few yellow and bright blues to fill in where I needed extra. I think they add just the right amount of pop!

flowerpowercloseup

I used a meandering or stippling free motion quilting design and can I say it has been awhile! I had a little rust on these skills:) After a bit I started to feel like I was getting back in the groove of things. You can see some of the curves are a little angular and almooooost criss-crossing, that is a supposed no-no with stippling:)

flowerpowereyelashing

Here are a few areas that started to have some “eyelashes” and you can see my stitches were a little too long.  I was moving too fast for my needle speed. This causes the tension to get off…especially noticeable in curves and the bobbin thread comes up too far=eyelashes. I just had to get my hands and the needle speed in sync and go a little slower to get smaller stitches.

flowerpowerbacking

It was hard to decide what color thread I wanted to use since there are so many different colors.  I went with a magenta color thread for this one, it was a predominant color in the quilt and I had a similar color for the backing fabric…..when in doubt, match the back! This will hide the work a bit if you are worried about your stitching abilities:) I knew I was rusty and it wouldn’t be perfect.

flowerpowerbinding

I finished it up with a matching binding using THIS machine binding tutorial….purple would have looked great, but sadly no there was no purple left:( so I used more pink…matching the binding with the backing is helpful for hiding mistakes too!

Keep it Sassy

You can find and follow TheSassyQuilter  on Facebook, Pinterest, Bloglovin’, Instagram, Twitter or by email updates(form on right sidebar)!

Share Button